Flash larger SD card image onto smaller card on Mac for your Raspberry Pi
Finally, something that works.
Maybe it’s Raspberry Pi OS or maybe its Raspbian or maybe its NOOBS. You flashed it onto a 32GB SD card without thinking, and now you want to clone it onto another card. Only, your other card is only 16GB.
This should work if your card has enough space, e.g. if you only used 4GB out of the 32GB, leaving you a whole 28GB of space free, but argh! It’s not so simple out of the box.
Or maybe you’re cloning from one 32GB card to another 32GB card, only to discover that from one manufacturer to another, 32GB can actually mean something slightly different! And again, it doesn’t fit.
Here finally are the complete steps to flash a larger SD card onto a smaller one, assuming you’re working on a Mac. 32GB to 16GB, 32GB to 8GB, 16GB to 8GB, 16GB to 4GB, 8GB to 4GB, it’s all good.
- Put in the original SD card and make the backup image. I used ApplePi-Baker v2.2.3 (don’t worry about using the “Enable Linux Partition Resize” option — in my case, it only gave errors), but it shouldn’t really matter, you can also use
dd. Let’s assume the image is calledbackup.img. In my case, it was a 32GB image. - Next, we will follow these instructions to the letter to shrink the image: first install the
pishrinktool:
curl -LO https://github.com/lisanet/PiShrink-macOS/archive/master.zip
unzip master
cd PiShrink-macOS-master
make
sudo make install
Then shrink your image:
pishrink backup.img backup_small.img
This may take some time.
-
Put in the smaller SD card (for me it was 16GB) and flash it with the small image
backup_small.img. Again, I used PiBaker. Don’t worry about using the “Enable Linux Partition Resize” option — in my case, it only gave errors. -
Boot the card in your Raspberry Pi.
-
Check how much free space you have using:
df -Bm
You will find that it does not take up the full card, e.g. for my 16GB card it was constrained to ~3GB and 94% full:
![]()
Run sudo raspi-config , select Advanced options and then Expand filesystem . It will ask you to reboot — do so.
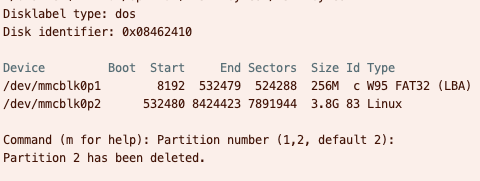
You will see in the log that the filesystem was originally 3.8GB:
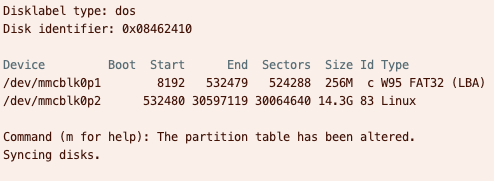
which is then grown to the full disk size, for me 14.3GB:
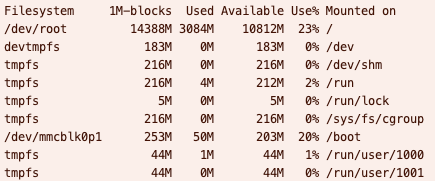
Later you can check again after reboot with df -Bm and validate that it worked:
Congrats! You successfully baked a larger SD card image onto a smaller card. Happy hacking.
Contents
Oliver K. Ernst
October 19, 2021